A
B
C
D
E
F
G
H
I
J
K
L
M
N
O
P
Q
R
S
T
U
V
W
X
Y
Z
Click a letter to see a list of conditions beginning with that letter.
Click 'Topic Index' to return to the index for the current topic.
Click 'Library Index' to return to the listing of all topics.
Discharge Instructions: Giving Yourself an Intramuscular (IM) Injection
Your healthcare provider has prescribed a medicine that must be given by IM (intramuscular) injection. IM injections use a needle and syringe to send medicine to large muscles in your body. IM injections are usually given in the thigh, hip, or upper arm.
You were shown how to give yourself an IM injection in the hospital. This sheet will help you remember those steps when you are at home.
Name of medicine: ________________________
Amount per injection: ________________________
Times per day: _____________________________
Number of days: ___________________________
Step 1. Get ready
Gather your supplies. You’ll need:
-
Medicine
-
Syringe
-
2 needles (one for drawing the medicine from the bottle (vial), another for giving the injection)
-
Alcohol pads
-
2-by-2-inch gauze pad
-
A special container to throw out the used needles and syringe (sharps container). You can buy a sharps container at a drugstore or medical supply store. You can also use an empty laundry detergent bottle, or any other puncture-proof container and lid.
Wash your hands well with soap and water or an alcohol-based hand sanitizer before and after all IM injections.
Step 2. Prepare your medicine
-
Be sure you have the right medicine. Look at the label on the medicine bottle and make sure it matches the name of the medicine you were prescribed.
-
Check the expiration date. If it's past this date, throw the medicine away.
-
Don’t use the medicine if it's discolored or has anything floating in it.
-
Clean the rubber stopper on the top of the bottle each time with an alcohol pad. Don’t touch the top of the bottle after it has been cleaned with the alcohol.
Step 3. Prepare your needle and syringe
-
Attach the needle to the syringe, if it's not already attached.
-
Take off the needle cap or needle guard and pull back on the end of the syringe (plunger).
-
Draw air into the syringe. The amount of air should be equal to the amount of medicine you need to take. Be careful. Don’t touch the needle.
-
Insert the needle into the rubber stopper on top of the medicine bottle. Push down on the plunger to push the air into the bottle (Image 1).
-
Leave the syringe in the bottle. Now turn the bottle upside down so that the bottle is on top and the syringe is on the bottom (Image 2).
-
Make sure that the tip of the needle is below the level of the liquid in the bottle. Pull back on the plunger. This will cause the medicine to fill the syringe (Image 3).
-
Stop pulling the plunger when the right amount of medicine is in the syringe, but don’t remove the needle from the bottle.
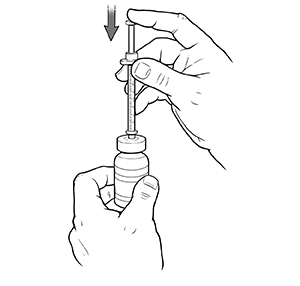 |
| Image 1. |
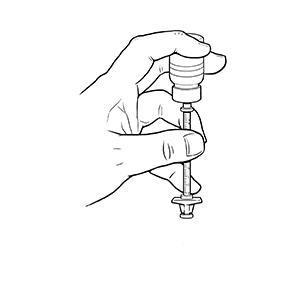 |
| Image 2. |
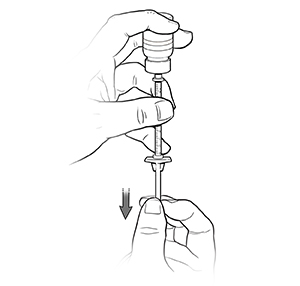 |
| Image 3. |
Step 4. Remove any air bubbles
-
Check the syringe for air bubbles.
-
To remove air bubbles, tap the barrel of the syringe with your finger or knuckle. This will move any bubbles to the top of the syringe (Image 4).
-
Push the plunger up to remove the air bubbles from the syringe.
-
Pull back on the plunger once more to fill the syringe with the correct amount of medicine.
-
Repeat these steps until all air bubbles are gone.
-
Remove the needle from the bottle.
-
If your healthcare provider has told you to replace the needle with a new one, then do so as instructed.
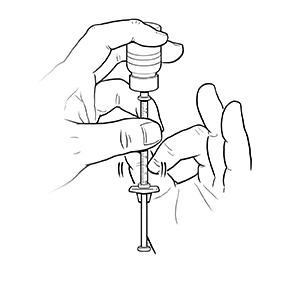 |
| Image 4. |
Step 5. Select and prepare an injection site
-
Select a site that avoids major blood vessels and nerves. You were shown these sites in the hospital. If you have questions, contact your healthcare provider.
-
Each time you do an injection, change sites. Don't use the same site over and over. Don't use areas that are bruised, scarred, painful, or swollen.
-
Keep a written injection record. Include the date, time, and site of each injection.
-
Clean the injection site with an alcohol pad and let it dry before injecting.
-
Remove the cap from the needle, if needed. Hold the syringe like a pencil. Use your other hand to stretch the skin flat around the injection site. But don’t touch the actual injection site.
Step 6. Inject the medicine
-
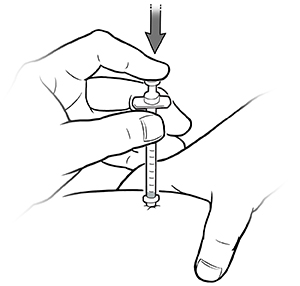
Insert the needle straight into the prepared injection site. Use a quick downward motion (Image 5).
-
Push down on the plunger at a steady rate. Inject all the medicine in the syringe.
-
Remove the needle by pulling the syringe and needle up and away from your body.
-
Release the stretched skin.
-
Press a 2-by-2-inch gauze pad onto the site.
-
Hold the pad tightly for a minute.
-
Check the area for redness, bleeding, or bruising.
-
Apply a bandage to the site, if needed.
 |
| Image 5. |
Step 7. After the injection
-
Never recap a needle you have used for an injection.
-
Throw the needle and syringe away in your sharps container. Make sure the needle and syringe fit easily in the container and that the needles point down. Don't put your fingers into the container. When the container is full, follow the instructions for disposing of the container. If you aren't sure how to dispose of it correctly, call your healthcare provider, health department, or local trash service for instructions.
-
Put all other supplies in the trash.
-
Wash your hands again.
Medicine that comes in a container for a single dose should be used only 1 time. If you use the container a second time, it may have germs in it that can cause infections. These infections usually affect the skin and soft tissues. But some infections can affect the brain, spinal cord, or heart. Sharing another person's used needles or medicines can cause other infections such as hepatitis B and hepatitis C.
Follow-up care
Follow up with your healthcare provider, or as advised.
When to call your healthcare provider
Call your healthcare provider right away if you have any of the following:
-
Needle that breaks off in the injection site
-
Problems that keep you from giving yourself the injection
-
Bleeding at the injection site that won’t stop
-
Severe pain at the injection site
-
Medicine injected into the wrong area
-
Rash or swelling at the injection site
-
Shortness of breath
-
Fever of 100.4°F (38°C) or higher, or as advised by your provider
Online Medical Reviewer:
Eric Perez MD
Online Medical Reviewer:
Jessica Gotwals RN BSN MPH
Online Medical Reviewer:
Paula Goode RN BSN MSN
Date Last Reviewed:
2/1/2022
© 2000-2025 The StayWell Company, LLC. All rights reserved. This information is not intended as a substitute for professional medical care. Always follow your healthcare professional's instructions.